
Email templates make sending emails to your clients easy. No more typing the same thing over and over again. Save the messages you send the most often as a template and save time. You can also use tokens to dynamically populate job or client data so the email is ready to go out when you want to use it.
Quick Creating
You can quickly create an email template by clicking Save as Template from the bottom of any email. If you'd like to manage your templates, or build a new one while you're not composing, head to Settings › Email Templates.

Email Types
You’ll set up your email templates with a certain Email type. This determines where in the system the template can be used and also provides context for which tokens can be used inside the template.

General Use
General Use emails are available in the Compose with template dropdown on the job's Mail tab. They are the most non-specific type of email and can be used for a variety of reasons, most often used for initial inquiry responses, follow ups, etc.

Invoicing
When looking at a sales order that has an open invoice, you can use the actions menu to Email Direct Link which will bring you to an email composer.

The templates dropdown in that email will show all your Invoicing type email templates. If you have one of your Invoicing email templates set up as the default it will populate the message automatically. You can, however, use the Templates dropdown to use any of your other Invoicing email templates.

Here's a great example of an Invoicing email template and the tokens you can use:
Dear {{recipient.first_name}},

This is a courtesy message to let you know that you have an invoice for {{invoice.balance}} due on {{invoice.due_date}} ({{invoice.due_period}}).

You can {{item.link_start}}pay this invoice online{{item.link_end}} at your convenience using our secure booking website.

If you have any questions, please don't hesitate to contact me.

Sincerely,
{{brand.email_signature}}
Notice that there is a line under the Subject that says what item this email is referencing. In this case it's the Invoice for: Branding Session. This is important as it will dictate which tokens can be used in this email.
As this email is referencing a specific invoice, invoice tokens will work here. If the email isn't referencing a specific invoice then invoice tokens wouldn't work in that scenario.
The 'item link' start and end tokens in this template can be used around your text to turn your text into a clickable link to the item the email is referencing. In this case, the 'pay your invoice online' text will become a clickable link to the specific invoice Invoice for: Branding Session so your client can pay that invoice.
Order Receipts
Order receipt email templates are accessible when using the Actions menu from the order on the Quotes & Orders Tab and selecting Email Direct Link:

This will load up an email composer where you'll see all of your Order Receipts type email templates. If you have one of your Order Receipts email templates set up as the default it will populate the message automatically. You can, however, use the Templates dropdown to use any of your other Order Receipts email templates.

Here's a great example of an Order Receipts email template and the tokens you can use:
Dear {{recipient.first_name}},

Thank you for choosing {{brand.name}}!

For your convenience, {{item.link_start}}your sales order is available online{{item.link_end}} in case you need to print a receipt or pay an invoice.

If you have any questions, please don't hesitate to contact me.

Sincerely,
{{brand.email_signature}}
Notice that there is a line under the Subject that says what item this email is referencing. In this case it's Branding Session. This is important as it will dictate which tokens can be used in this email.
As this email is referencing a specific order, order tokens will work here. If the email isn't referencing a specific order then order tokens wouldn't work in that scenario.
The 'item link' start and end tokens in this template can be used around your text to turn your text into a clickable link to the item the email is referencing. In this case, the 'your sales order is available online' text will become a clickable link to the specific order Branding Session for your client.
Payment Receipts
There are two ways that Payment Receipt emails are sent: automatically when a payment is made online or manually when you go to the Financials tab on a job choose the Send Payment Receipt option next to that payment.
Automatically sending a payment receipt:
When you set up your payment gateways through one of the numerous payment processors, you can specify which payment receipt template is sent to your client automatically. You can learn more about that here.
Manually sending a payment receipt:
From a job’s Financials tab, after you have recorded a payment, you can click on the arrow next to that payment to select Send Payment Receipt:

This will open an email composer where you'll be able to select from any of your Payment Receipts type email templates.

Here's a great example of a Payments Receipts email template and the tokens you can use:
Dear {{recipient.first_name}},

Thank you for choosing {{brand.name}}!

Here's a receipt for your recent payment:

{{payment.summary_box}}

If you have any questions, please don't hesitate to contact me.

Sincerely,
{{brand.email_signature}}
The {{payments.summary_box}} token is a great one to use in this email template as it will show a summary of the payment amount, the date received and the name of the order it applies to. Here's how the template above would populate for the client:

Notice that there is a line under the Subject that says what item this email is referencing. In this case it's Payment $583.00. This is important as it will dictate which tokens can be used in this email.
As this email is referencing a specific payment, payment tokens will work here. If the email isn't referencing a specific payment then payment tokens wouldn't work in that scenario.
Similarly, tokens that don't relate to a payment (e.g. booked order tokens or contract tokens) won't work here as the email isn't specifically referencing an order or a contract, so those tokens wouldn't populate in this email.
If you did want to include a link to the order in your payment receipt email, the best option would be to include a link to the Client Portal. Your client will be able to view their order in their client portal and print a PDF for their records from there. In that case, you might want to update your payment receipt email template to something like this:
Dear {{recipient.first_name}},

Thank you for choosing {{brand.name}}!

Here's a receipt for your recent payment:

{{payment.summary_box}}

To view and print your full order, please head over to your client portal here: {{recipient.portal_linked}}

If you have any questions, please don't hesitate to contact me.

Sincerely,
{{brand.email_signature}}
Here's how this template would now populate for the client:

Quote Invitation
After you’ve created a new quote from the Quotes & Orders tab on a job, you can click the ‘Email Quote’ button to send it.

A new email composer will appear and you’ll be able to access any of your Quote Invitation email templates from the templates menu.

Notice how right below the subject line, the email is referencing ‘GIF and Giggle Photo Booth’. That is the context of the tokens in the email.
Questionnaire Invitation
When you create Questionnaire Invitation email templates, they are accessible by clicking on the ’email’ button after you’ve created a questionnaire invitation:

A new email composer will appear where your Questionnaire Invitation email templates will be available from the Templates dropdown menu.

Notice how under the subject line, the email is referencing the questionnaire we’re sending.
Contract Invitation
When sending a contract outside of a quote/proposal, you’ll send it by clicking on the ’email’ button after you’ve added a contract on the Contracts tab. This is where your Contract Invitation email templates will be available:

A new email composer will appear and you’ll be able to access any of your contract email templates from the templates menu.

Notice how right below the subject line, the email is referencing NKP Wedding Contract. That is the context of the tokens in the email.
Adding Tokens
Tokens allow you to populate data into your emails without having to type it manually.
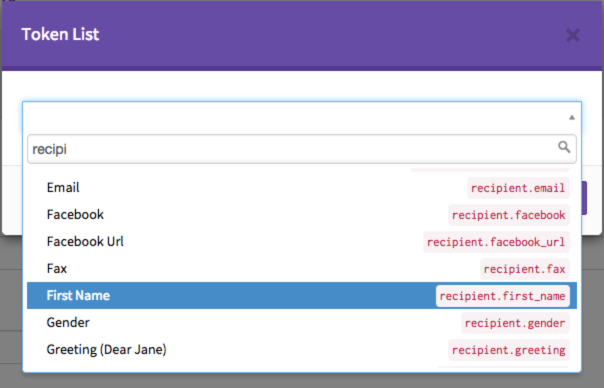

You’ll then be presented with a token browser where you can search for and insert tokens. Click here for a complete list of tokens available.
Tokens in Context
Because tokens are data specific, they need to be in the right context in order to show the right information.
Remember how when we are sending our email templates above and each email type has a different item it was referencing? In the example below our ‘Invoicing’ email is referencing ‘Invoice for: Collection Three’. Because we are referencing an invoice in this case, the invoice tokens will work. Outside of an ‘Invoicing’ email, the tokens won’t know what data to fill in there because it will be out of context.

Item Tokens
Item tokens represent the referenced items in our emails.
Whenever we’re using an email template, other than a ‘General Use’ template, we’re sending a link to something; a questionnaire, a proposal, an invoice, an order, etc. So there are certain tokens, that we need to ALWAYS include in those emails. They are our ‘item’ tokens. We can actually use several different methods and achieve the same results.
Method 1 - {{item.name_link}}
When used alone, this will create a hyperlink to the item you’re referencing.
This is the easiest method.

This will turn the token into a hyperlink like this:
Invoice for: Wedding Collection 2
Method 2- {{item.link_start}} and {{item.link_end}}
Using the item link start and end tokens turn everything in between them into the hyperlink to your item.

This will turn into a hyperlink like this:
Balance Invoice
Method 3 - {{item.link_start}} {{item.name}} {{item.link_end}}
Just like Method 2, we’re using the item link start and end tokens to turn everything in between into a hyperlink. We’re also adding the item.name token to insert our referenced item in there.

This will turn into this:
Please complete our Wedding Proposal.
our Wedding Proposal will be hyperlinked here.
Method 4 - {{item.link_url}}
This method works, but it’s not the prettiest.

This will replace the token with the URL to the referenced item like this:
http://tave.com/yourbrandalias/proposal/959f44ab523bc3e22f9c5a0b/6593e5aca730771fcca494e8